Measuring the Wind
This lesson focuses on how anemometers are engineered to measure the speed of wind, and how designs have changed over time. Student teams design and build a working anemometer out of everyday materials.
- Learn about anemometers.
- Learn about engineering design.
- Learn how engineering can help solve society’s challenges.
- Learn about teamwork and problem solving.
Age Levels: 8-18
Build Materials (For each team)
Required Materials (Trading/Table of Possibilities)
- Aluminum foil
- Plastic/paper/styrofoam cups
- String
- Bendable wire (i.e. florist or craft wire)
- Straws
- Wooden craft/popsicle sticks
- Small wood spoons
- Small wood (balsa) pieces
- Paperclips
- Rubber bands
- Toothpicks
- Cardboard
- Plastic wrap
Testing Materials
- Hair dryer or fan with 3 speed settings (or if you are in a windy environment, the testing can be completed outside)
- Graph paper
Materials
- Hair dryer or fan with 3 speed settings (or if you are in a windy environment, the testing can be completed outside)
- Graph paper
Process
Using a fan or hairdryer, test each team’s anemometer 3 different times at 3 different wind speeds (low, medium, high). During each test, teams should document the wind speed that was measured by their anemometer (based on rotations) and average wind speed.
Then, using graph paper, teams should draw a chart that indicates how the wind speed, as measured by their anemometer, increased as the fan or hair dryer speed setting increased. The average wind speeds should be used for the graph.
Design Challenge
You are a team of engineers who have been given the challenge of designing and building your own anemometer out of everyday materials. You also must devise a system for measuring and recording the speed of the wind as indicated by your anemometer.
Criteria
- Top portion must be able to move freely without resistance to spin or turn quickly.
- Must be able to sustain the wind generated by a fan or hairdryer at varying speeds
- Must have a way to measure and chart rotations at different wind speeds
Constraints
- Use only the materials provided.
- Teams may trade unlimited materials.
- Break class into teams of 2-3.
- Hand out the Measuring the Wind worksheet, as well as some sheets of paper for sketching designs.
- Discuss the topics in the Background Concepts Section. Consider asking students whether they want to make a 4-cup or 3-cup design and why. They will need to determine what scale they will use to measure the wind speed.
- Review the Engineering Design Process, Design Challenge, Criteria, Constraints and Materials.
- Provide each team with their materials.
- Explain that students must design and build their own working anemometer from everyday materials, and that the team must devise a system for measuring and recording the speed of the wind as indicated by their anemometer
- Announce the amount of time they have to design and build (1 hour recommended).
- Use a timer or an on-line stopwatch (count down feature) to ensure you keep on time. (www.online-stopwatch.com/full-screen-stopwatch). Give students regular “time checks” so they stay on task. If they are struggling, ask questions that will lead them to a solution quicker.
- Students meet and develop a plan for their anemometer. They agree on materials they will need, write/draw their plan, and present their plan to the class. Teams may trade unlimited materials with other teams to develop their ideal parts list.
● Students will likely measure the number of revolutions of their anemometer, so you may need to suggest that one of the cups or wind catchers is a different color than the others for easier counting of revolutions.
● The top portion must be able freely move without resistance to spin or turn quickly. Using a straw or pointed object on which the top piece will pivot or spin is essential.
● Students may wish to develop a four cup design, a three cup design, or come up with a new design. Vary this challenge for younger students. - Teams build their designs.
- Using a fan or hairdryer, test each team’s anemometer 3 different times at 3 different wind speeds (low, medium, high). During each test, teams should document the wind speed that was measured by their anemometer (based on rotations) and average wind speed.
Then, using graph paper, teams should draw a chart that indicates how the wind speed, as measured by their anemometer, increased as the fan or hair dryer speed setting increased. The average wind speeds should be used for the graph. - Using graph paper, teams draw a chart that indicates how the wind speed, as measured by their anemometer, increased as the fan or hair dryer speed increased. They should use their average wind speeds for the graph.
- As a class, discuss the student reflection questions.
- For more content on the topic, see the “Digging Deeper” section.
Student Reflection (engineering notebook)
- Did you succeed in creating a anemometer that measured the three different “wind” speeds? If not, why did it fail?
- Did you decide to revise your original design or request additional materials while in the construction phase? Why?
- Did you find that the readings from one of your tests may have resulted in a major shift in your average reading for that wind speed?
- If your anemometer was used to test a location to see if it would be a good site to install a wind turbine to harness wind energy, do you think that three tests per speed setting would be enough to generate a reliable average? If not, how many tests do you think would be adequate?
- If you could have had access to materials that were different than those provided, what would your team have requested? Why?
- Do you think that engineers have to adapt their original plans during the construction of systems or products? Why might they?
- If you had to do it all over again, how would your planned design change? Why?
- What designs or methods did you see other teams try that you thought worked well?
- Why do you think the design of anemometers changed so much over time?
- List three other pieces of equipment that have been re-engineered over time to improve functionality.
Time Modification
The lesson can be done in as little as 1 class period for older students. However, to help students from feeling rushed and to ensure student success (especially for younger students), split the lesson into two periods giving students more time to brainstorm, test ideas and finalize their design. Conduct the testing and debrief in the next class period.
What is an Anemometer?
An anemometer is a device that is used for measuring wind speed, and is one instrument used in a weather station. The term is derived from the Greek word anemos, meaning wind. The first anemometer was invented by Leonardo da Vinci. Leonardo actually designed two different types of instruments for measuring wind speed. You can see the drawings for both on the left.
The first one was called a “lamellae” or “pennello” anemometer because feathers were once used to gauge wind speed. It was a graduated stick with a thin plate which moved according to the force of the wind.
Others were made from cone shaped tubes and were designed to check that the wind pressure turning the wheels was proportional to the opening in the cones through which the air passed, given the same wind speed.

Four Cup Anemometer
A simple type of anemometer is the cup anemometer, invented in 1846 by Dr. John Thomas Romney Robinson. It included four cups which were mounted on one end of four horizontal arms, which were attached at 90 degree angles to each other on a vertical shaft. Wind blowing horizontally would turn the cups at a speed that was proportional to the wind speed. If you counted the turns of the cups over a specific period of time, you could determine the average wind speed for that location. When Robinson first designed his anemometer, he incorrectly stated that no matter how big the cups were or how long the arms were, the cups always moved at one-third of the speed of the wind. It was later discovered that the actual relationship between the speed of the wind and that of the cups, called the “anemometer factor,” actually depended on the dimensions of the cups and arms, and may have a value between two and a little over three.
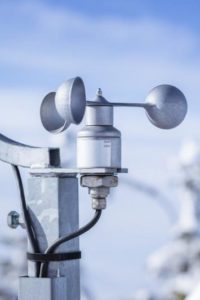
Three Cup Anemometer
Four cups anemometers were found to experience delays in accuracy when wind speeds changed quickly. So, the three cup anemometer was engineered to improve accuracy and especially in environments where wind might change quickly or unexpectedly. The three cup anemometer was first developed by the Canadian John Patterson in 1926. As is true of many engineered products, they are improved or “re-engineered” over time to enhance performance, reduce costs, or boost safety. In 1935, the three cup anemometer was enhanced by Brevoort & Joiner of the United States. Their work led to a cup-wheel design which was more accurate with an error rate of less than 3% at speeds up to 60 miles per hour (mph). In 1991, the design was changed by the Australian Derek Weston to be able to measure both wind direction and wind speed. Weston added a tag to one cup, which caused the speed to increase and decrease as the tag moved alternately with and against the wind. Three cup anemometers are currently used as the industry standard for wind energy assessment studies.
Using Anemometers to Test Wind Potential
An anemometer is a device that is used for measuring wind speed. Many countries and organizations offer anemometer loan programs, so a company or individual can evaluate the wind at their site to determine if enough wind power would be generated at their location. For these test sites, an anemometer might collect wind-speed data in 10-minute intervals over a long period of time.
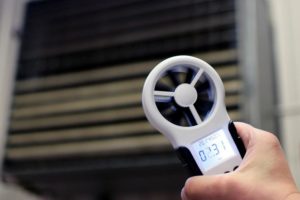
Sonic Anemometers
Sonic anemometers (see photo right) were first developed in the 1970s and use ultrasonic sound waves to measure wind speed and direction. They measure wind velocity based on the time of flight of sonic pulses between pairs of transducers. The lack of moving parts makes them appropriate for long term use in exposed automated weather stations and weather buoys where the accuracy and reliability of traditional cup-and-vane anemometers is adversely affected by salty air or large amounts of dust.
Material Selection
The materials selected for designing an anemometer are often based on their intended application. For example, anemometers intended for low wind speed applications, such as air pollution studies, are usually made from lightweight materials. Because of their materials, though, they are not well suited for very windy or icy environments. Materials selection is also important for anticipating the lifespan of the equipment.
- Anemometer: Device that is used for measuring wind speed, and is one instrument used in a weather station.
- Constraints: Limitations with material, time, size of team, etc.
- Criteria: Conditions that the design must satisfy like its overall size, etc.
- Engineers: Inventors and problem-solvers of the world. Twenty-five major specialties are recognized in engineering (see infographic).
- Engineering Design Process: Process engineers use to solve problems.
- Engineering Habits of Mind (EHM): Six unique ways that engineers think.
- Four Cup Anemometer: Included four cups which were mounted on one end of four horizontal arms, which were attached at 90 degree angles to each other on a vertical shaft. Wind blowing horizontally would turn the cups at a speed that was proportional to the wind speed.
- Iteration: Test & redesign is one iteration. Repeat (multiple iterations).
- Prototype: A working model of the solution to be tested.
- Sonic Anemometer: Use ultrasonic sound waves to measure wind speed and direction.
- Three Cup Anemometer: Engineered to improve accuracy and especially in environments where wind might change quickly or unexpectedly.
Internet Connections
- National Renewable Energy Laboratory – Wind Research
- Institute and Museum of the History of Science, Florence, Italy
Recommended Reading
- Wind Energy – The Facts: A Guide to the Technology, Economics and Future of Wind Power by European Wind Energy Association (ISBN: 1844077101)
- Wind Energy in the Built Environment (ISBN: 0906522358)
Writing Activity
Write an essay about why an airport might have several anemometers at different heights to provide information to airport controllers?
Alignment to Curriculum Frameworks
Note: Lesson plans in this series are aligned to one or more of the following sets of standards:
- U.S. Science Education Standards (http://www.nap.edu/catalog.php?record_id=4962)
- U.S. Next Generation Science Standards (http://www.nextgenscience.org/)
- International Technology Education Association’s Standards for Technological Literacy (http://www.iteea.org/TAA/PDFs/xstnd.pdf)
- U.S. National Council of Teachers of Mathematics’ Principles and Standards for School Mathematics (http://www.nctm.org/standards/content.aspx?id=16909)
- U.S. Common Core State Standards for Mathematics (http://www.corestandards.org/Math)
- Computer Science Teachers Association K-12 Computer Science Standards (http://csta.acm.org/Curriculum/sub/K12Standards.html)
National Science Education Standards Grades K-4 (ages 4 – 9)
CONTENT STANDARD A: Science as Inquiry
As a result of activities, all students should develop
- Abilities necessary to do scientific inquiry
- Understanding about scientific inquiry
CONTENT STANDARD B: Physical Science
As a result of the activities, all students should develop an understanding of
- Position and motion of objects
CONTENT STANDARD D: Earth and Space Science
As a result of their activities, all students should develop an understanding of
- Changes in earth and sky
CONTENT STANDARD E: Science and Technology
As a result of activities, all students should develop
- Abilities of technological design
- Understanding about science and technology
CONTENT STANDARD F: Science in Personal and Social Perspectives
As a result of activities, all students should develop understanding of
- Science and technology in local challenges
CONTENT STANDARD G: History and Nature of Science
As a result of activities, all students should develop understanding of
- Science as a human endeavor
National Science Education Standards Grades 5-8 (ages 10 – 14)
CONTENT STANDARD B: Physical Science
As a result of their activities, all students should develop an understanding of
- Motions and forces
- Transfer of energy
CONTENT STANDARD E: Science and Technology
As a result of activities in grades 5-8, all students should develop
- Abilities of technological design
CONTENT STANDARD F: Science in Personal and Social Perspectives
As a result of activities, all students should develop understanding of
- Science and technology in society
CONTENT STANDARD G: History and Nature of Science
As a result of activities, all students should develop understanding of
- History of science
National Science Education Standards Grades 9-12 (ages 14-18)
CONTENT STANDARD B: Physical Science
As a result of their activities, all students should develop understanding of
- Motions and forces
CONTENT STANDARD D: Earth and Space Science
As a result of their activities, all students should develop understanding of
- Energy in the earth system
CONTENT STANDARD E: Science and Technology
As a result of activities, all students should develop
- Abilities of technological design
- Understandings about science and technology
CONTENT STANDARD F: Science in Personal and Social Perspectives
As a result of activities, all students should develop understanding of
- Science and technology in local, national, and global challenges
CONTENT STANDARD G: History and Nature of Science
As a result of activities, all students should develop understanding of
- Historical perspectives
Next Generation Science Standards Grades 3-5 (Ages 8-11)
Motion and Stability: Forces and Interactions
Students who demonstrate understanding can:
- 3-PS2-1. Plan and conduct an investigation to provide evidence of the effects of balanced and unbalanced forces on the motion of an object.
Students who demonstrate understanding can:
- 4-PS3-1. Use evidence to construct an explanation relating the speed of an object to the energy of that object.
Engineering Design
Students who demonstrate understanding can:
- 3-5-ETS1-1.Define a simple design problem reflecting a need or a want that includes specified criteria for success and constraints on materials, time, or cost.
- 3-5-ETS1-2.Generate and compare multiple possible solutions to a problem based on how well each is likely to meet the criteria and constraints of the problem.
- 3-5-ETS1-3.Plan and carry out fair tests in which variables are controlled and failure points are considered to identify aspects of a model or prototype that can be improved.
Next Generation Science Standards Grades 6-8 (Ages 11-14)
Engineering Design
Students who demonstrate understanding can:
- MS-ETS1-2 Evaluate competing design solutions using a systematic process to determine how well they meet the criteria and constraints of the problem.
Next Generation Science Standards Grades 9-12 (Ages 14-18)
Energy
Students who demonstrate understanding can:
- HS-PS3-3. Design, build, and refine a device that works within given constraints to convert one form of energy into another form of energy.
Principles and Standards for School Mathematics
Number and Operations Standard
- Understand numbers, ways of representing numbers, relationships among numbers, and number systems
Data Analysis and Probability Standards
- Formulate questions that can be addressed with data and collect, organize,
and display relevant data to answer them.
Common Core State Standards for School Mathematics Grades 2-8 (ages 7-10)
Geometry
- Graph points on the coordinate plane to solve real-world and mathematical problems.
- CCSS.Math.Content.5.G.A.2 Represent real world and mathematical problems by graphing points in the first quadrant of the coordinate plane, and interpret coordinate values of points in the context of the situation.
Standards for Technological Literacy – All Ages
The Nature of Technology
- Standard 1: Students will develop an understanding of the characteristics and scope of technology.
- Standard 3: Students will develop an understanding of the relationships among technologies and the connections between technology and other fields of study.
Technology and Society
- Standard 5: Students will develop an understanding of the effects of technology on the environment.
Design
- Standard 8: Students will develop an understanding of the attributes of design.
- Standard 9: Students will develop an understanding of engineering design.
- Standard 10: Students will develop an understanding of the role of troubleshooting, research and development, invention and innovation, and experimentation in problem solving.
Abilities for a Technological World
- Standard 11: Students will develop abilities to apply the design process.

 Industrial Engineering
 Computer Engineering
You are working as a team of engineers who have been given the challenge to design your own anemometer out of everyday items. You’ll be testing your anemometer in several different “wind” speeds generated by a fan or hairdryer in your classroom. You also must devise a system for measuring and recording the speed of the wind as indicated by their anemometer. And, you’ll need to chart your wind speeds on a graph, review the designs of other student “engineering” teams, and present your findings to the class.

Planning Stage
Meet as a team and discuss the problem you need to solve. You’ll need to decide if you want to make a four cup or three cup anemometer — or maybe you’ll have a better idea and a new design! Then your team needs to develop and agree on a design for your anemometer. You’ll need to determine what materials you want to use — keep in mind that your design must be strong enough to withstand wind from a fan or hairdryer and you’ll have to be able to generate information about the speed of the wind on a scale you develop — so there may be some design elements you can engineer into your anemometer to help you keep track of the motion. Draw your design in the box below, and be sure to indicate the description and number of parts you plan to use. Present your design to the class. You may choose to revise your teams’ plan after you receive feedback from class.
|
|
| Materials Needed:
|
Construction Phase
Build your anemometer. During construction you may decide you need additional materials or that your design needs to change. This is ok — just make a new sketch and revise your materials list.
Testing Phase
Each team will test their anemometer at three different “wind” speeds using a classroom fan or hairdryer. Test three times at each speed and determine your average wind speed for each setting of your fan or hairdryer. At each test indicate in the box below what you observe the wind speed to be. Be sure to watch the tests of the other teams and observe how their different designs worked.
| Test # | Fan Speed Setting | Wind Speed as Measured by Anemometer | Average Wind Speed at Fan Speed Setting |
| 1 | Low | ||
| 2 | Low | ||
| 3 | Low | ||
| 1 | Medium | ||
| 2 | Medium | ||
| 3 | Medium | ||
| 1 | High | ||
| 2 | High | ||
| 3 | High |
Documentation Phase
Using graph paper, draw a chart that indicates how the wind speed as measured by your anemometer increased as the fan or hairdryer speed setting increased. Use your average wind speeds for the graph.
Evaluation Phase
Evaluate your teams’ results, complete the evaluation worksheet, and present your findings to the class.
Use this worksheet to evaluate your team’s results in the “Measuring the Wind” activity.
- Did you succeed in creating an anemometer that measured the three different “wind” speeds? If not, why did it fail?
- Did you decide to revise your original design or request additional materials while in the construction phase? Why?
- Did you find that the readings from one of your tests may have resulted in a major shift in your average reading for that wind speed?
- If your anemometer was used to test a location to see if it would be a good site to install a wind turbine to harness wind energy, do you think that three tests per speed setting would be enough to generate a reliable average? If not, how many tests do you think would be adequate?
- If you could have had access to materials that were different than those provided, what would your team have requested? Why?
- Do you think that engineers have to adapt their original plans during the construction of systems or products? Why might they?
- If you had to do it all over again, how would your planned design change? Why?
- What designs or methods did you see other teams try that you thought worked well?
- Why do you think the design of anemometers changed so much over time?
- List three other pieces of equipment that have been re-engineered over time to improve functionality.
1.
2.
3.
Downloadable Student Certificate of Completion